
If you’re looking to spruce up your living space without breaking the bank, DIY wood furniture projects are a fantastic way to go. Not only do they allow you to customize your home to fit your style, but they can also be a fun way to spend your weekends. From coffee tables to garden planters, there’s something here for everyone. So grab your tools and let’s dive into these 10 creative projects that will transform your home!
Key Takeaways
- DIY wood furniture can save you money and add a personal touch to your home.
- These projects are suitable for all skill levels, from beginners to experienced woodworkers.
- Using reclaimed wood can give your furniture a unique and rustic look.
- Don’t be afraid to customize designs to fit your needs and style.
- Each project can be completed over a weekend, making them perfect for a fun home improvement activity.
1. Rustic Coffee Table
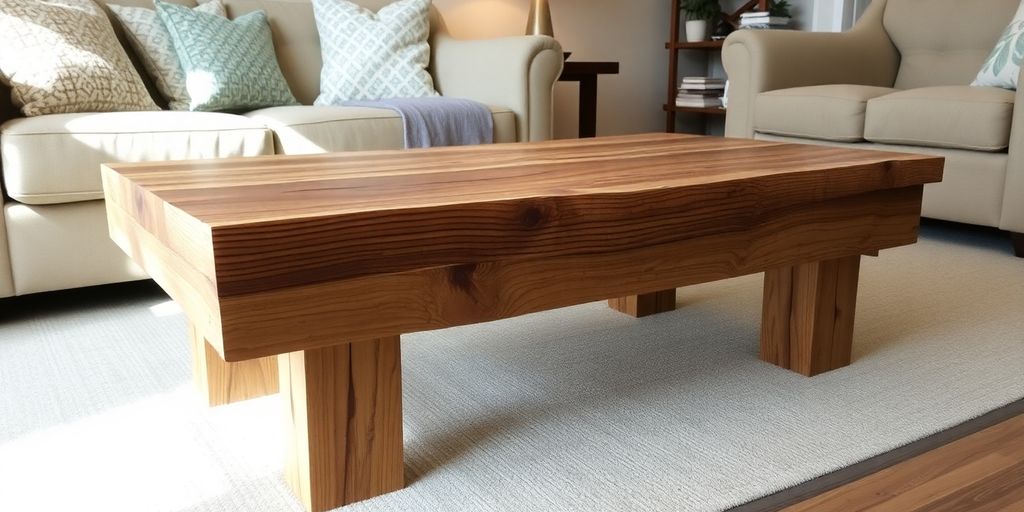
Okay, so you want to add some rustic charm to your living room? A DIY coffee table is a fantastic way to do it! It’s way easier than you might think, and you can totally customize it to fit your space and style. Plus, there’s something super satisfying about building your own furniture.
Let’s get started! First, think about the size and shape you want. Do you want a big, chunky table or something a little more delicate? Once you have a vision, you can start gathering your materials. Reclaimed wood is perfect for that rustic look, but you can also use new lumber and distress it yourself.
Here’s a basic rundown of the steps:
- Gather your wood: Pallets, reclaimed boards, or new lumber – whatever floats your boat.
- Cut and sand: Get those boards to the right size and smooth out any rough edges.
- Assemble the base: This could be as simple as attaching legs or building a more elaborate frame.
- Attach the tabletop: Secure the boards to the base, making sure everything is nice and sturdy.
- Finish it off: Stain, paint, or seal the wood to protect it and bring out its natural beauty.
Don’t be afraid to get creative with the design! Add metal accents, incorporate storage, or try a unique shape. The possibilities are endless. And remember, it doesn’t have to be perfect. The imperfections are what give it that rustic character!
Once you’ve built your table, it’s time to decorate! Consider using creative ideas for decorating a coffee table to make it a focal point in your living room.
2. Floating Shelves

Floating shelves are a fantastic way to add storage and style to any room without taking up too much space. I remember when I first put some up in my living room – it completely changed the vibe! They’re surprisingly easy to install, and the possibilities are endless. You can use them for books, plants, photos, or just about anything else you want to display. Plus, they look super modern and clean.
One of the best things about floating shelves is how customizable they are. You can choose different types of wood, stains, and sizes to match your existing decor. I’ve seen some really cool ones made from reclaimed wood, which adds a rustic touch. And if you’re feeling extra creative, you can even build your own from scratch. It’s a great way to show off your personal style and add a unique touch to your home.
I’ve found that using a stud finder is absolutely essential for installing floating shelves. Trust me, you don’t want to skip this step unless you want your shelves to come crashing down! Also, make sure to use the right type of screws and anchors for your wall type. It makes a huge difference in the stability of the shelves.
Here are a few ideas to get you started:
- Entryway Organizer: Install a small floating shelf near your front door to hold keys, mail, and other essentials.
- Bathroom Storage: Use floating shelves in your bathroom to store toiletries, towels, and decorative items. This is a great way to maximize space in a small bathroom.
- Kitchen Display: Display your favorite cookbooks, spices, or decorative items on floating shelves in your kitchen. It adds a touch of personality to the space.
Thinking about the best way to decorate with floating shelves can really transform a room. They’re not just for storage; they’re a design element that can make a big impact.
3. Pallet Sofa
Okay, so maybe you’re thinking, "A sofa made of pallets?" Trust me, it’s way cooler than it sounds! This project is all about upcycling and creating a unique, comfy seating area. Plus, it’s super budget-friendly. You can usually find pallets for free or really cheap. Let’s get into it!
First things first, you’ll need to source some pallets. Make sure they’re heat-treated (look for the ‘HT’ stamp) and not chemically treated, because safety first! Give them a good clean and sand them down to avoid splinters. Nobody wants a splintery sofa!
Now, for the fun part: assembly! You can arrange the pallets in a bunch of different ways to get the size and shape you want. Stack them for height, arrange them in an L-shape for a corner sofa, or keep it simple with a straight line. Secure them together with screws and brackets to make sure they’re nice and sturdy. Add some comfy cushions and throws, and you’ve got yourself a super cool, eco-friendly sofa. It’s a great way to add some rustic charm to your living room or outdoor space.
This project is surprisingly easy and customizable. You can paint the pallets, add storage underneath, or even build in some lighting. The possibilities are endless!
Here’s a quick list of things you’ll need:
- Pallets (obviously!)
- Screws and brackets
- Sandpaper
- Cushions and throws
And here’s a table showing the approximate cost breakdown:
| Item | Estimated Cost |
|---|---|
| Pallets | $0 – $50 |
| Screws/Brackets | $10 – $20 |
| Sandpaper | $5 – $10 |
| Cushions | $50 – $200 |
| Total | $65 – $280 |
Building a pallet sofa is a fantastic way to add a unique and personalized touch to your home. It’s also a great conversation starter! So, grab some pallets and get building!
4. Farmhouse Dining Table
Okay, so a farmhouse dining table? That’s a project I can get behind! There’s something so inviting about a big, sturdy table where everyone can gather. It’s not just a piece of furniture; it’s a centerpiece for memories. Plus, building one yourself? Seriously satisfying.
I remember when I first thought about building my own farmhouse table. I was intimidated! All those perfect tables online made me think it was way beyond my skills. But honestly, it’s totally doable, even if you’re like me and sometimes struggle to hammer a nail straight. The key is to take it one step at a time, and don’t be afraid to embrace the imperfections – that’s what gives it character!
A well-made farmhouse table can last for generations.
Here’s a basic idea of what you’ll need:
- Wood (obviously! Reclaimed wood is awesome for that rustic look)
- Screws and wood glue (your best friends)
- Sandpaper (lots of it, for that smooth finish)
- Stain or paint (to match your style)
- Basic tools: saw, drill, measuring tape
Building a farmhouse table is more than just a DIY project; it’s about creating a space where family and friends can connect, share meals, and make memories. It’s about adding a touch of warmth and character to your home, and knowing that you built it with your own two hands. So grab your tools, get inspired, and start building your dream table today!
Don’t worry too much about making it perfect. The little flaws are what make it unique. Think of it as adding your own personal touch to a piece that will be around for years to come. And hey, if I can do it, anyone can! Check out this step-by-step instructions for building your own farmhouse dining table.
5. Wooden Bench
Alright, let’s talk benches! A wooden bench is a super versatile piece. You can use it indoors, outdoors, as extra seating, or even as a decorative element. Plus, it’s a great project for all skill levels. Don’t be intimidated; you can totally do this!
One of the coolest things about building your own bench is that you get to customize it to fit your space and style. Want a rustic look? Go for reclaimed wood. Prefer something modern? Try sleek lines and a dark stain. The possibilities are endless!
Here’s the deal: building a bench is easier than you think. With some basic tools and a little bit of patience, you can create a beautiful and functional piece of furniture that you’ll be proud to show off.
I remember when I built my first bench. I was so nervous, but once I got started, it was actually really fun. And now, every time I see it, I feel a sense of accomplishment. Seriously, give it a try!
Here are a few ideas to get you started:
- Entryway Bench: Perfect for kicking off your shoes and storing bags.
- Garden Bench: A cozy spot to relax and enjoy your outdoor space. Check out these bench projects for inspiration.
- Dining Bench: A stylish alternative to chairs at your dining table.
6. Nightstand
Okay, so you need a spot for your lamp, your book, and maybe a glass of water, right? A nightstand is the perfect solution, and building one yourself is surprisingly simple. Plus, you can totally customize it to fit your bedroom’s vibe. I remember when I built my first one – it was a little wobbly, but hey, it had character!
Building a nightstand is a great way to add a personal touch to your bedroom.
There are tons of cool ideas out there, from super basic to more advanced. Don’t be intimidated! Start with something simple, and you’ll be amazed at what you can create. You can even repurpose old materials for a rustic look. I’ve seen people use old drawers, crates, and even pallets to make awesome nightstands. Get creative and have fun with it!
A DIY nightstand is not just a piece of furniture; it’s a statement. It reflects your style and resourcefulness. Plus, it’s way more satisfying than buying something from a store.
Here are a few ideas to get you started:
- Wide Open Stand: A simple, minimalist design that’s easy to build and looks great in modern bedrooms. Check out some nightstand ideas for inspiration.
- Step Ladder Nightstand: A quirky and unique option that adds a touch of whimsy to your space.
- Hanging Nightstand: Perfect for small spaces, this design saves floor space and looks super cool.
7. Bookshelf
Okay, so you’ve got books, right? And maybe they’re just…lying around. A bookshelf is the answer! It’s a classic DIY project, and there are so many ways to make it your own. Plus, it’s a great way to show off your literary taste (or at least, the books you want people to think you’ve read).
I’ve been wanting to build a bookshelf for ages, and I think this is the year I finally do it. I’m picturing something rustic, maybe with some reclaimed wood. Or maybe something super modern and minimalist. The possibilities are endless!
Here’s the thing: don’t overthink it. A bookshelf is basically just a bunch of shelves stacked on top of each other. You can make it as simple or as complicated as you want. And if you mess up? Well, that’s what sandpaper and paint are for!
I think the best part about building your own bookshelf is that you can customize it to fit your exact needs. Need extra-tall shelves for those oversized art books? No problem! Want a secret compartment for your chocolate stash? Go for it!
Here are a few ideas to get you started:
- Simple Shelving Unit: This is the easiest option. Just cut some wood to size, sand it down, and screw it together. You can even use pre-made shelves from the hardware store.
- Floating Shelves: These look super cool and are surprisingly easy to install. Just make sure you use the right hardware to support the weight of your books.
- Ladder Bookshelf: Lean a ladder against the wall and use the rungs as shelves. This is a great option for small spaces.
Building a bookshelf is a rewarding project that adds both function and style to your home. Plus, you’ll get the satisfaction of knowing that you built it yourself. So grab some wood, dust off your tools, and get ready to create a DIY bookshelves masterpiece!
8. Garden Planter Box
Okay, so you’ve got all these amazing plants, but where are you gonna put them? A DIY garden planter box is the answer! It’s a super fun and relatively easy project that can add a ton of charm to your patio, balcony, or even your indoor space. Plus, you get to customize it to perfectly fit your style and needs. Let’s get building!
Building a planter box is easier than you think, and the results are so rewarding.
First things first, you’ll need to gather your supplies. Reclaimed wood is a great option for a rustic look, or you can use cedar for its weather-resistant properties. You’ll also need some basic tools like a saw, drill, screws, and measuring tape. Don’t forget a liner to protect the wood from moisture!
Here’s a simple step-by-step guide:
- Measure and cut the wood pieces to your desired dimensions. Think about the size of the space where you’ll be placing the planter box and the types of plants you want to grow.
- Assemble the sides, bottom, and ends of the box using screws. Make sure everything is nice and square for a professional look.
- Line the inside of the box with a plastic liner to prevent the wood from rotting. You can use a heavy-duty trash bag or purchase a pre-made planter liner.
- Add drainage holes to the bottom of the liner to allow excess water to escape. This is crucial for preventing root rot.
- Fill the planter box with high-quality potting soil and get ready to plant your favorite flowers, herbs, or veggies!
I built a couple of these last spring, and they’ve held up great! I used cedar wood and added a coat of sealant for extra protection. It’s so satisfying to see my plants thriving in something I made with my own two hands. Plus, it was way cheaper than buying a pre-made planter box from the store.
If you’re looking for a fun and rewarding DIY project, a garden planter box is definitely worth considering. It’s a great way to add some personality to your outdoor space and create a thriving garden oasis. You can even build your own raised garden beds for even more planting space!
9. Console Table
Console tables are super versatile! They can jazz up an entryway, fill that awkward space behind your sofa, or even act as a mini bar. Plus, building one yourself means you get to customize it to perfectly fit your space and style. Let’s get into it!
A DIY console table is a great way to add character to your home.
Here’s a simple approach to building your own:
- Planning: Measure the space where you want the table to go. Decide on the height, width, and depth. Sketch out a design. This is where you can get creative! Think about adding shelves, drawers, or a unique leg design.
- Cutting: Cut all your wood pieces according to your plan. Accuracy is key here, so take your time and double-check your measurements. A miter saw can be a lifesaver for clean, accurate cuts.
- Assembly: Assemble the frame first, then add any shelves or drawers. Use wood glue and screws for a strong, lasting hold. Clamps are your best friend during this step!
Console tables are a fantastic way to showcase your personal style. Whether you prefer a rustic, modern, or minimalist look, you can tailor the design to match your home’s aesthetic. Don’t be afraid to experiment with different wood types, stains, and finishes to create a truly unique piece.
If you’re looking for more detailed instructions, check out this step-by-step guide for building a DIY console table. You’ll be amazed at what you can create!
10. Storage Ottoman
Who doesn’t love extra storage? A storage ottoman is the perfect blend of style and function. Plus, it’s a great way to use up some of that scrap wood you’ve been hoarding! Let’s get into it.
This project is surprisingly simple and super rewarding. You’ll end up with a stylish piece of furniture that also hides away clutter. Think blankets, books, or even those board games you never play but can’t bear to part with.
Here’s what you’ll need:
- Wood (obviously!)
- Hinges
- Fabric of your choice
- Foam padding
- Basic tools (saw, drill, staple gun, etc.)
I remember when I built my first storage ottoman. I was so proud of myself! It wasn’t perfect, but it was functional, and it looked great in my living room. It’s a project that anyone can tackle, and the results are well worth the effort.
First, build a basic wooden box. This will be the frame of your ottoman. Next, attach hinges to one side of the box and a piece of wood that will serve as the lid. Then, add foam padding to the lid for comfort. Finally, cover the lid with fabric, securing it with a staple gun. And there you have it – a DIY storage ottoman! It’s a fantastic way to add both seating and hidden storage to any room. You can customize the size, shape, and fabric to match your existing decor. Get creative and have fun with it!
Wrap-Up: Get Creative with Your DIY Projects!
So there you have it! Ten fun and creative DIY wood furniture projects that can really change up your space. Whether you’re looking to build a cozy coffee table or a stylish bookshelf, these ideas are perfect for adding a personal touch to your home. Remember, it’s all about having fun and letting your creativity shine. Don’t worry if things don’t go perfectly—every project is a chance to learn and grow. So grab your tools, pick a project, and get started! You might just surprise yourself with what you can create!
Frequently Asked Questions
What tools do I need for DIY wood projects?
For most wood projects, you’ll need basic tools like a saw, hammer, drill, and sandpaper. A measuring tape and level are also helpful.
Where can I find wood for my projects?
You can get wood from hardware stores, lumber yards, or even recycle old furniture. Pallets are also a great option for DIY projects.
Is it hard to build furniture from scratch?
It can be challenging at first, but with practice and the right instructions, anyone can learn to build furniture. Start with simple projects.
How do I finish my wood projects?
You can finish your wood projects with paint, stain, or sealant. This helps protect the wood and gives it a nice look.
Can I customize my DIY furniture?
Absolutely! One of the best parts of DIY projects is that you can customize them to fit your style and needs.
Are there safety tips I should follow while working with wood?
Yes, always wear safety goggles and a mask when cutting or sanding wood. Keep your workspace clean and be aware of your surroundings.